Although this may be true, FileZilla is the best open source software that helps to install and configure FTP easily on Windows, Linux and Mac OS. Of course, FileZilla is the perfect FTP solutions for both client and server. In this article, I will discuss how to install FileZilla client software as well as configure FTP on Windows XP/vista/7/8/10 and other earlier Microsoft versions. Important to realize that FileZilla is supporting FTP, FTP over TLS and SFTP so far. Surprisingly it will be available in free or cost. You can download compatible version on your Windows systems and use without any issues.
FileZilla FTP Software Download and Installing Windows Systems
- At first, go to the official FileZilla page for the following link:-
https://filezilla-project.org/

2. After that, download the latest and supported version of FileZilla for your systems.

3. Next, Run the FileZilla client setup software.

4. Install and run on it.
Configure FTP using FileZilla in Windows
Before you are going to start configuration can you aware of the following terms.
Host: Specify the domain name for which hosting account files you want to access via FTP.
Username: The hosting account username
Password: The hosting account password
Port: Usually, FTP Port 21, set by default.

Quick connect option in FileZilla: –
If you want to access FTP in the root directory, then quick connect is the reliable option. Just entering the host, username, password and port number then click the “quick connect” button here.
Step 1: At first, enter the host name. (For example, ftp.errorexpress.com)
Step 2: Enter the valid username and password for your cPanel account.
Step 3: Next to providing the port number. (default port is 21)
Step 4: Click the “Quickconnect” button in filezilla.

Step 5: In case if you are facing unknown certificate warning dialogue box, then check the tick mark “Always trust certificate in future sessions” and click the “OK” button.

Step 6: Finally, your FTP directory is open and successfully retrieved data’s here.
Saving FTP Configuration in Site Manager
Notably, FileZilla quick connect option is asking whenever you connect and accessing your files so that you need to provide all necessary details all times. On the other hand, are you frustrating each time when your server host and credentials?
Don’t worry the good news is FileZilla having an option to saving your FTP configuration for the site manager.
The below steps instruct to setting up and saving your FTP configuration forever in FileZilla.
As a result, you don’t need to enter your server information for all the times.
Step 1: Open your FileZilla FTP client software.
Step 2: Go to File-> Site Manager or press the keyboard Ctrl+S in windows.

Step 3: Click the “New Site” button under the site manager tab.
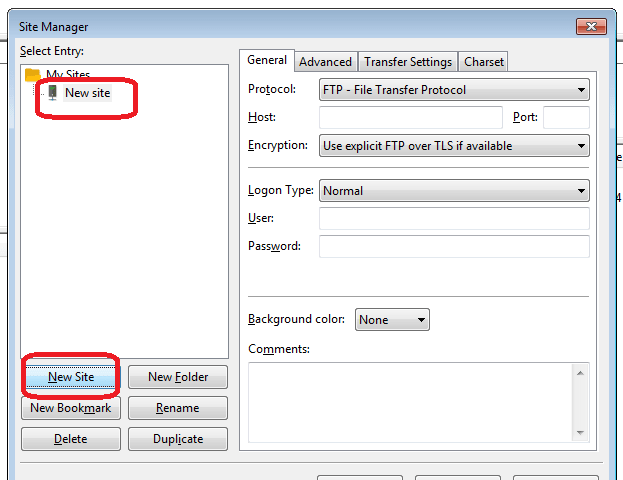
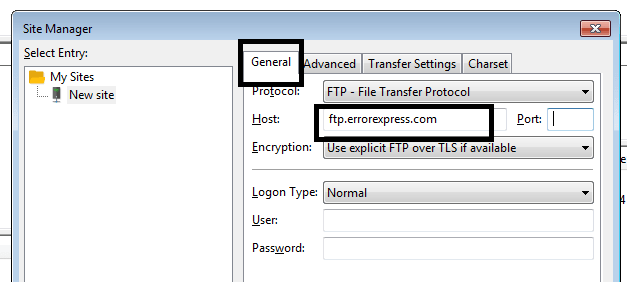
Step 4: In the “General” tab, enter the hostname you want to connect.
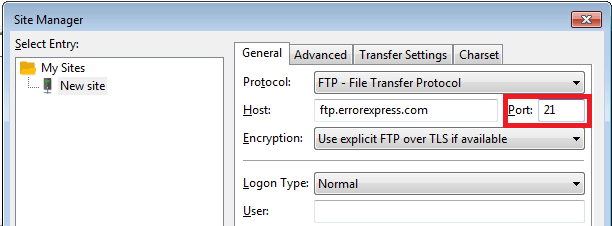
Step 5: Next enter the port number “21“.
Step 6: Make sure once again Logon type option selected for “Normal“.
Step 7: Afterwards provide the FTP username and password.
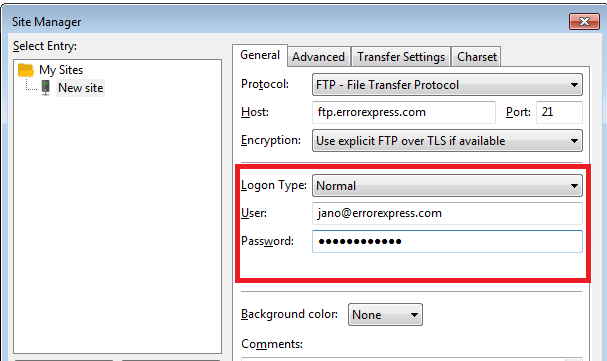
Step 8: Finally click the ok button. That’s it! Your FTP configuration saved.

FTP in Specified Directory for FileZilla Windows: –
By default, FTP connection is successful then it will open the root directory.
At the same time, FTP has configured the specified directory then following steps below.
Step 9: By the same token, repeat step 1 to step 7.
Step 10: Click the “advanced” tab.

Step 11: Find the text-box named “Default remote directory“.
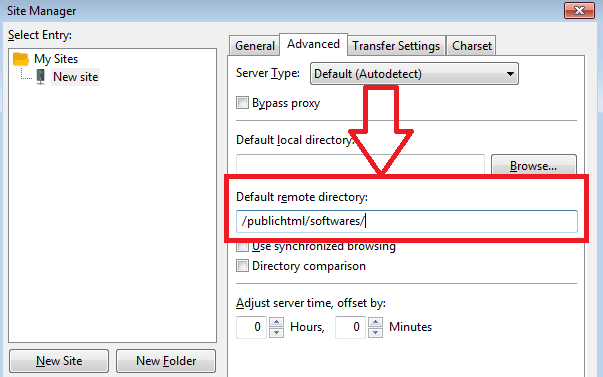
Step 12: Next, enter the specified directory path here and click “ok” button.
Step 13: After all, click the “connect” button once and ensure your specified FileZilla remote directory working correctly.

Conclusion:
Of course, FileZilla is the best user-friendly application to configure and access your server files via FTP. In the end, I hope you understand how to install and configure FTP Using FileZilla software in Microsoft Windows operating systems. By the way, you can share on social media for this informative tutorial and helps your friends too 🙂
You may also consider this article
how to restore taskbar in windows 7
how to use three whatsapp on single android phone
how to fix api-ms-win-crt-runtime-l1-1-0.dll is missing
How to test Internet speed online and command prompt
How to clear and reset browser history, bookmarks and cookies
Can you block someone from emailing you on Gmail Account?


