

If you are looking to install active directory users and computers tools on your Microsoft windows 10/8/vista/7 then obviously this article will help you. By default, Active Directory tools are not available in Windows operating systems. So that if you want to install, then you manually download this updated package in official Microsoft site.I believe that the below steps helpful for your needs.
Table of Contents
Windows 7 – Steps to install the Active Directory Users and Computers tools
As was previously stated, the Active Directory doesn’t install your Windows 7 systems. Given these points, guide how to add users and computers tools in your local as well as remote computers.
Download and Install Windows 7 Remote Server Administration Tools Package
Step 1: At first thing go to the following official Microsoft website link: –
https://www.microsoft.com/en-AU/download/details.aspx?id=7887

Step 2: Under the “Remote Server Administration Tools for Windows 7 with Service Pack 1 (SP1)” click “Download” button.

Step 3: Make sure once you have to download this package whether x64(64 bit) or X86(32 bit).
(Note: – if you don’t know your system type then go to Start-> right click the “computer” tab and click properties.)
Step 4: Select the appropriate active directory package and click the “Next” button.

Step 5: Now, the file is download here.
Step 6: After download completion, run the setup, and installed your system.

Step 7: During install this package it will show the dialogue box and ask, “Do you want to install the following windows software update” then click the “Yes” button.

Step 8: Hereafter reading those Microsoft terms and conditions and click “I Accept” button.

Step 9: After installation is complete, then click the “Close” button.
Turn on “Active Directory Administrative Center” windows feature in Control Panel:
Step 10: Go to the windows start menu -> click “Control Panel.”

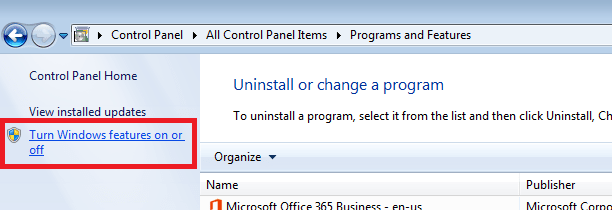
Step 11: Press “Programs and Features” option under the “Adjust your computer’s settings” screen.

Step 12: In the left side window, find the option named “Turn Windows features on or off” and click that link.
Step 13: however, it will show the “Windows Features” popup screen here.

Step 14: Scroll down the mouse as well as to find “Remote Server Administration Tools.”

Select the Active Directory Administrative Center option
Step 15: Next expand the following directory “Remote Server Administration Tools > Role Administration Tools > AD DS and AD LDS Tools > AD DS Tools.”
![]()
Step 16: Moreover, tick the checkbox named “Active Directory Administrative Center.”

Step 17: After all finished then click the “OK” button.

Step 18: System sometimes takes to save these changes.
Step 19: Restart your Windows 7 system once.

Step 20: Henceforth go to the windows start menu and type “Active Directory Users and Computers” to make sure the option is showing here or not.

RSAT Installation for Windows 10/8 1809 and other advanced versions
Admittedly, if you are using windows 10 version 1809 and any other higher versions, then Microsoft installer cannot support this RSAT installation.because its already there in windows feature. So that you can following these steps to turn on this RSAT Active Directory tools.
Step 1: Go to the start menu in your Windows 10 system.
Step 2: Next select “settings->apps->Manage optional features->Add feature.”
Step 3: Find the option named as “RSAT: Active Directory Domain Services and Lightweight Directory Tools.”
Step 4: Click “Install,” then the system can take some time to update this new feature.
Step 5: After a while, this tool will be appeared and belongs to the “Start -> Windows Administrative Tools.”
Windows 10/8 1803 and other earlier version- Steps to install the Active Directory Users and Computers tools
Similarly, Windows 10/8 systems also do not have this feature so that you can download and install these Active Directory users and computers tools here.
Note: – Active directory installation only allowed for Windows 10 Professional or Enterprise systems.
In other kinds of Windows 10 versions, “Remote Server Administration Tools” installation will not work so far.
Official download page for Windows 10 administrative tools
Step 1: Go to that following Microsoft page link:-
https://www.microsoft.com/en-us/download/details.aspx?id=45520

Step 2: Click the “download button” under “Remote Server Administration Tools” for Windows 10.

Step 3: Make sure your Windows 10 system type (32 bit/64 bit) first and tick the mark for a suitable package.

Step 4: After-all click the “Next” button then download is to start.

Install Windows 10/8 Remote Server Administration Tools on your system
Step 5: Locate the active directory download folder and run that setup one by one.


Step 6: During your installation, it will ask the confirmation “windows update standalone installer” prompt then you can click “Yes” to proceed further installations.

Step 7: By the same way, install all packages in your windows 10/8 systems. I download the three files so that I can Install those all three files sequentially.
Active Directory Administrative Center – Turn ON this Windows Feature
Step 8: In windows start menu type “Control Panel.”

Step 9: Choose the following option here.
“Control panel -> Programs -> Programs and Features -> Turn Windows features on or off”
Step 10: In that dialog box, scroll down your mouse continuously and find the “Remote Server Administration Tools” option.
Step 11: Expand this selection, then some list of tools shows here.
Step 12: For now, expand (+) the “Role Administration Tools.”
Step 13: Select the checkbox for belongs to the “AD DS Tools.” after that suddenly windows systems will install some files, and everything will be done then prompt says rebooting the system.

Step 14: Next Restart your system and after select the start menu and type your keyboard “active directory” then ensure once again users & computers administrative tools shows in your windows 10/8 or other earlier versions.
Suppose Windows 10 “Remote Server Administration Tools” option is not there?
Step 1: On the other hand, Windows Features doesn’t have the option “Remote Server Administration Tools” then alternatively you can following these instructions.
Step 2: Likewise, follow above step 1 to step 9.
Step 3: “Turn Windows features on or off” dialog box choose the option “Active Directory Lightweight Directory Services” and click “OK” button.

Step 4: Then Windows updated for these new changes.


Step 5: After that, everything will ok, type windows start menu for “active directory” and check this “Active Directory Users and Computers” should install correctly.
