
")
Table of Contents
To Learn the Steps For How To Bypass Google Account Verification After Reset?
In this article, We’ll learn how to bypass your google account verification after reset. This verification is also known as Factory Reset Protection. It is an anti-theft measure to secure a phone. In case it’s stolen and somebody else is trying to access it. If you have forgotten your previous email address and password, And can’t sign in back. Then this article will help you greatly.
Add Network & Write YouTube URL
Step-1: First of all, you can make sure that you have an active internet connection on your mobile phone. This can be anything either Wifi or Mobile Network.
Step-2: Now go to Wifi Settings, Which you would encounter when you open the phone; And click on the Add Network button.

Step-3: Now in the SSID bar you have to write www.youtube.com. From next, you can long-press the URL. And you will get a bunch of different options. Now click on the link sign as shown in the image. The sign could look different but the overall feature would remain the same across all devices.

Step-4: Once you click on the link sign, The stock version of the Youtube app from your phone would start. Now click on the icon in the top-right section of the app.

Open the Youtube Terms & Policy option
Step-5: Now, Click on the Terms and Privacy Policy button. Once you click that, A dialogue box would appear from the bottom. You have to choose google chrome from the given option. Do not choose the native browser as that might not work properly.

Step-6: Now when you open your chrome browser it will have a very new interface. You just click continue, and no thanks to directly jumping to the homepage of the chrome browser.
Step-7: Once the website for the Youtube Terms and Privacy is loaded, Now you have to search for an app in the search bar.
Install Quick Short Maker Apk on your phone
Step-8: Search the quick short maker app in your search bar. Then, you can click on the first link from apk mirror and download the application on your device.

Step-9: For the first time when you click download chrome will ask for storage permission. Click on continue. And even after that, it will show a little warning at the bottom of the page that this type of file can be harmful. Just click on continue.
Step-10: Once the download has started you can’t see it in the notification bar. Because you can’t scroll don the notification feature. To check the status of the download, click on the three-dotted icon on the top-right side of your screen. And from the given option choice download. Of course, you can check the download status here.

Step-11: Open the downloaded app, For the first time it will ask you to allow the unknown source app from security just do that. After allowing the permission click on the install button.

Find Package com.android.settings & Go To Developer Mode
Step-12: Once the app is installed click on the open button. And then you can search for settings, Scroll, and find the one with package name com.android.settings.
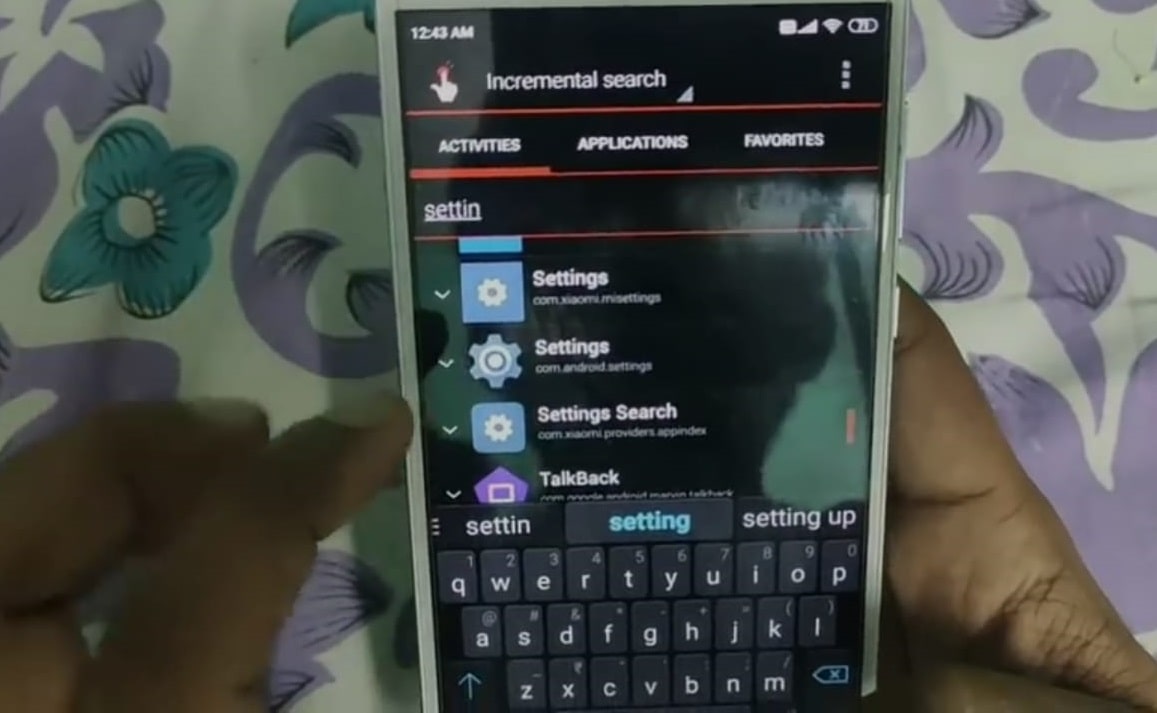
Step-13: After clicking on that particular icon you will transition to a new layout. Here, you have to click on the Try button. Just the moment you click on that button your settings will open.

Step-14: Now you can go to About Phone. And click on your mobile version 5 times until the Developer option is visible.
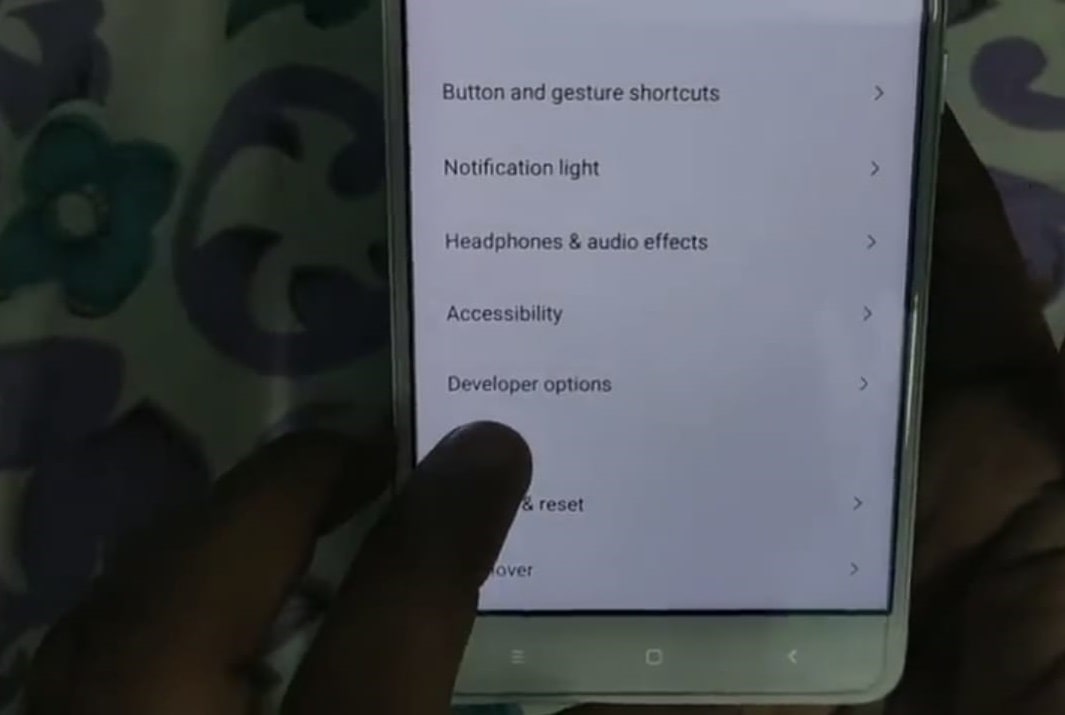
Enable OEM Unlocking & Factory Reset the Phone
Step-15: Now go to Additional Setting, And then just scroll and you will find the Developer option here. From the developer, options scroll and find the OEM unlocking and enable the same. If it doesn’t get enabled the first time keep doing it until it stays enabled.

Step-16: Now go to backup and reset, And then factory data reset. After clicking on the Reset phone button, you can reset your phone.
Step-17: Now when the reset is over, And your device boots up again. The FRP system would be removed. And you can use your phone like brand new out of the box.